-
动静态资源分离
-
对静态资源进行缓存
-
使用ATS,Nginx,Varnish作缓存处理
-
各缓存方案的特性对比
-
使用ATS作缓存
-
安装
-
配置
-
ATS中重要的几个组件
-
使用Nginx作缓存
-
使用Varnish作缓存
-
安装
-
配置
-
启动/关闭/重载
-
编写VCL
-
Varnish Agent
-
总结
-
参考文献
对于一个站点,大家应该都比较清楚,资源大概就分为静态资源(js/css等),图片,文件,动态数据等。对于加快动态数据访问,通常是需要后端程序或数据结构作优化,才能比较明显地得到提升,并不是一个立竿见影的过程。但对于静态资源(js/css等),图片,文件等的访问,则可以通过一些缓存,压缩,合并等技术,就能得到比较明显的提升,本文将探讨下使用缓存来加快静态资源,图片等的访问,主要使用Varnish。
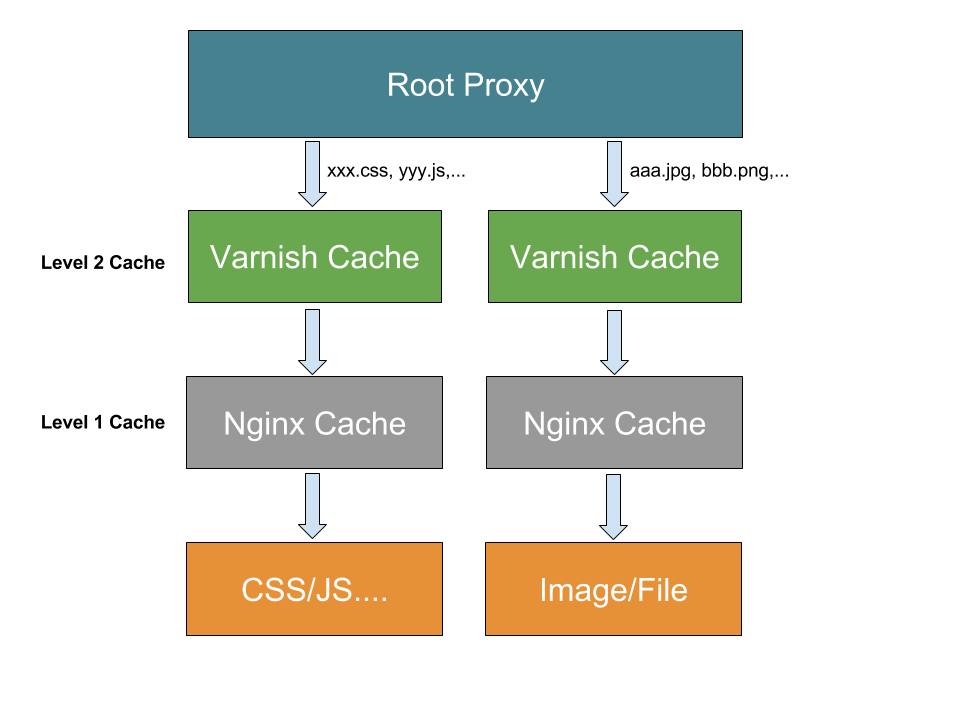
通常,对于具有一定规模的站点,是需要将动态资源(如后端服务提供的API数据接口)和静态资源(如图片,文件,js/css等)独立部署的,因为这些资源具有不同的访问属性,在运维层面也会有不同的策略,比如服务器配置,缓存策略等,下面是一个比较简易的部署架构:
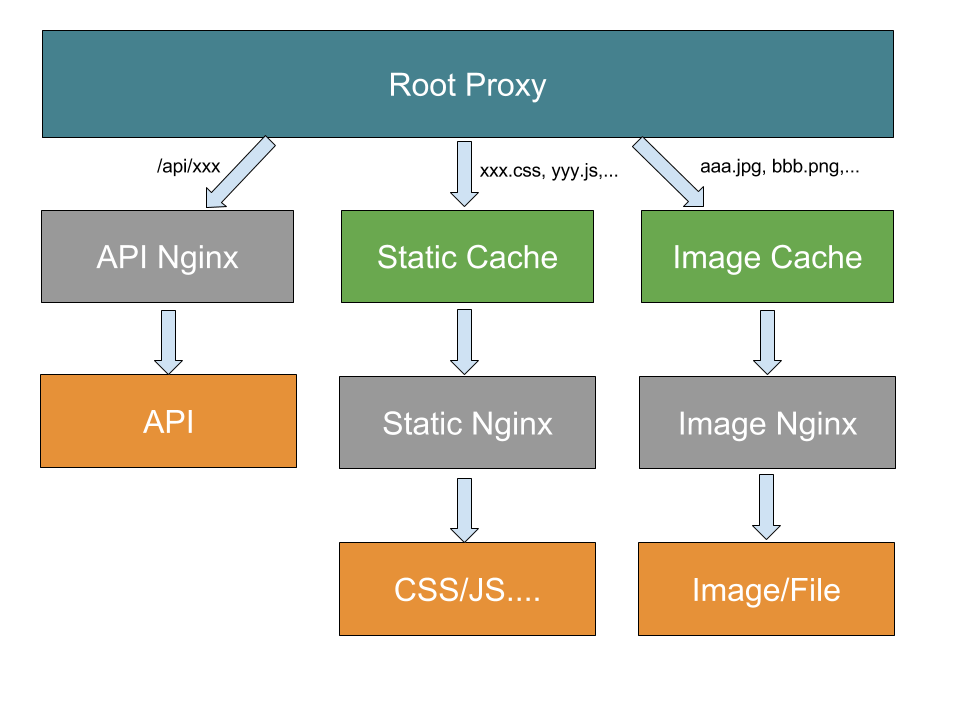
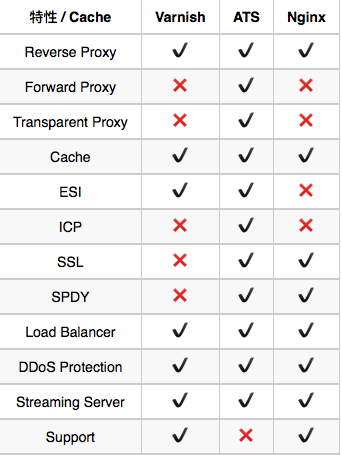
将动静态资源分离访问后,由于静态资源通常不会有内容更新,所以对它们进行缓存处理是再好不过,这也减少了不必要的资源解析,加载等,对于静态资源的缓存,也有许多比较成熟的解决方案,如Squid,Apache Traffic Server,Varnish,Nginx等,这里讲主要介绍ATS,Varnish,Nginx作资源缓存处理。ATS和Nginx基于文件缓存,而Varnish则基于内存缓存(收费的Varnish Plus应该支持文件)。
各缓存方案的一些特性对比:
# 安装依赖包
yum -y install pkgconfig libtool gcc make openssl tcl tcl-devel expat pcre libcap flex hwloc lua ncurses ncurses-devel

# 配置 & 编译 & 安装
git clone https://git-wip-us.apache.org/repos/asf/trafficserver.git
cd trafficserver/
./configure --prefix=/path/to/${TRAFFIC_SERVER_HOME}
make && make check && make install

# 启动traffic_server
/path/to/ats_home/bin/traffic_server start

# 关闭traffic_server
/path/to/ats_home/bin/traffic_server stop
# 反向代理配置:/path/to/ats_home/etc/trafficserver/records.config
CONFIG proxy.config.http.cache.http INT 1
CONFIG proxy.config.reverse_proxy.enabled INT 1
CONFIG proxy.config.url_remap.remap_required INT 1
CONFIG proxy.config.url_remap.pristine_host_hdr INT 1
CONFIG proxy.config.http.server_ports STRING 80
# 后端服务器配置:/path/to/ats_home/etc/trafficserver/remap.config
# 若要实现多个后端,需要使用balancer插件
regex_map http://(.*)/ http://${BACKEND_SERVER_ADDR}/
# 缓存存储:/path/to/ats_home/etc/trafficserver/storage.config
# 有条件可以配置多个裸分区,以便高可用
# 该配置只是缓存使用磁盘大小,而ATS使用的缓存内存大小可以在records.config中通过proxy.config.cache.ram_cache.size指定
/path/to/cache 500G
具体各配置详情可见这里。
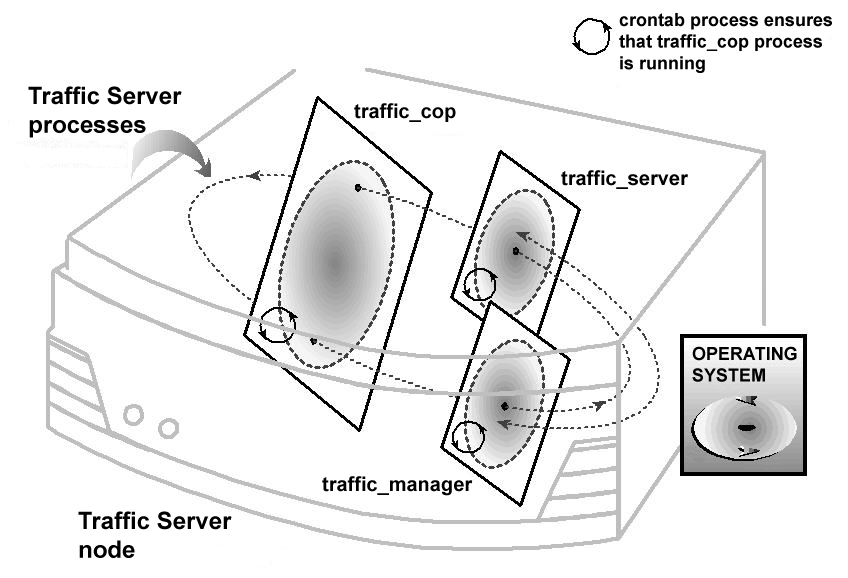
如下图,ATS中主要包含了 traffic_server, traffic_manager, traffic_cop组件:
使用nginx作缓存比较简单,只需使用proxy_cache指令,配置如下:
# 配置缓存区
http {
    # ...
    # /path/to/cache_path :缓存目录
    # levels=1:2 :表示缓存目录的第一级目录是1个字符,第二级目录是2个字符,如/path/to/cache_path/a/a0
    # keys_zone=cache1:1024m :缓存区名称及分配的内存大小
    # inactive=1d :缓存对象若1天内未被访问会被cache manager删掉
    # max_size=10g:表示该缓存区磁盘大小为10g
    proxy_cache_path /path/to/cache_path levels=1:2 keys_zone=cache1:1024m inactive=1d max_size=10g;
    # ...
}
开启需要作缓存的server,如:
server{
    # ...
    location ~ .(jpg|png|gif|jpeg)$ {
        proxy_pass http://{your_upstream};
        # 使用的缓存区
        proxy_cache cache1;
        # 缓存的键
        proxy_cache_key $host$uri$is_args$args;
        # 设置状态码为200和304的响应可以进行缓存,并且缓存时间为10分钟
        proxy_cache_valid 200 304 10m;
        # 客户端缓存30天
        expires 30d;
    }
    # ...
}
通常,可以在日志中输出缓存命中状态变量upstream_cache_status,以作缓存命中率统计:
# 日志中加入upstream_cache_status
log_format main '$remote_addr - $remote_user [$time_local] "$http_x_forwarded_for" "$request" '
                '$status $body_bytes_sent $bytes_sent "$http_referer" "$http_user_agent"'
                '"$upstream_addr" "$upstream_response_time" $request_time $upstream_cache_status';
# 统计命中率
if [ $1x != x ] then
    if [ -e $1 ] then
        HIT=`cat $1 | grep HIT | wc -l`
        ALL=`cat $1 | wc -l`
        Hit_rate=`echo "scale=2;($HIT/$ALL)*100" | bc`
        echo "Hit rate=$Hit_rate%"
    else
        echo "$1 not exsist!"
    fi
else
    echo "usage: ./ngx_hit_rate.sh file_path"
fi
./ngx_hit_rate.sh /path/to/access.log
必要的时候,有可能需要手动失效缓存,可通过proxy_cache_purge模块实现:
location ~ /purge(/.*) {
    # 允许的IP
    allow 127.0.0.1;
    deny all;
    proxy_cache_purge cache1 $host$1$is_args$args;
}
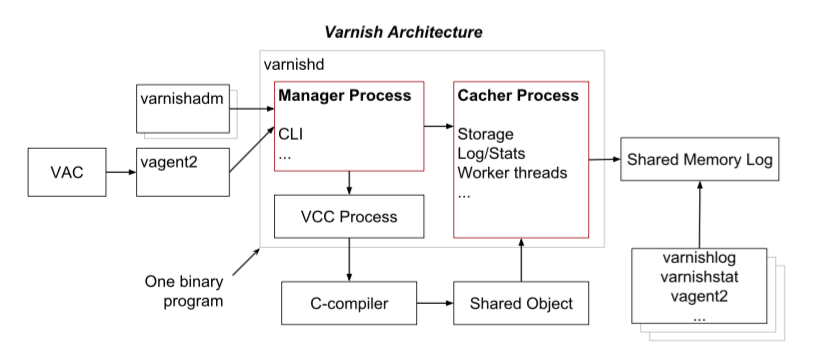
Varnish与前两者不同,使用内存来缓存对象,即不会有磁盘I/O操作,也是最终选择的方案。可以看下其基本架构:
# 安装varnish rpm
yum install epel-release
# for centos 6
rpm --nosignature -i https://repo.varnish-cache.org/redhat/varnish-4.1.el6.rpm
# for centos 7
rpm --nosignature -i https://repo.varnish-cache.org/redhat/varnish-4.1.el7.rpm
# 安装varnish
yum install varnish
# 若安装报错Error: xz compression not available
yum remove epel-release
rm -rf /var/cache/yum/x86_64/6/epel/
# vim /etc/sysconfig/varnish
# 最大的打开文件数(ulimit -n)
NFILES=131072
# 最大的内存锁大小(ulimit -l)
MEMLOCK=82000
# 最大的进程数
NPROCS="unlimited"
RELOAD_VCL=1
# VCL配置文件
VARNISH_VCL_CONF=/etc/varnish/default.vcl
# varnish监听端口
VARNISH_LISTEN_PORT=80
# varnish_admin监听地址
VARNISH_ADMIN_LISTEN_ADDRESS=127.0.0.1
# varnish_admin监听端口
VARNISH_ADMIN_LISTEN_PORT=81
# 密钥文件
VARNISH_SECRET_FILE=/etc/varnish/secret
# 最小线程数
VARNISH_MIN_THREADS=50
# 最大线程数
VARNISH_MAX_THREADS=1000
# 缓存内存大小,由于内存引用和内存碎片,能用于缓存对象的大致有75%
VARNISH_STORAGE_SIZE=256M
# 缓存配置
VARNISH_STORAGE="malloc,${VARNISH_STORAGE_SIZE}"
VARNISH_TTL=120
DAEMON_OPTS="-a ${VARNISH_LISTEN_ADDRESS}:${VARNISH_LISTEN_PORT} \
             -f ${VARNISH_VCL_CONF} \
             -T ${VARNISH_ADMIN_LISTEN_ADDRESS}:${VARNISH_ADMIN_LISTEN_PORT} \
             -p thread_pool_min=${VARNISH_MIN_THREADS} \
             -p thread_pool_max=${VARNISH_MAX_THREADS} \
             -S ${VARNISH_SECRET_FILE} \
             -s ${VARNISH_STORAGE}"
# 启动
service varnish start
# 停止
service varnish stop
# 重新加载vcl,通常这个比较常用,重启动varnish将导致内存中的缓存失效
service varnish reload
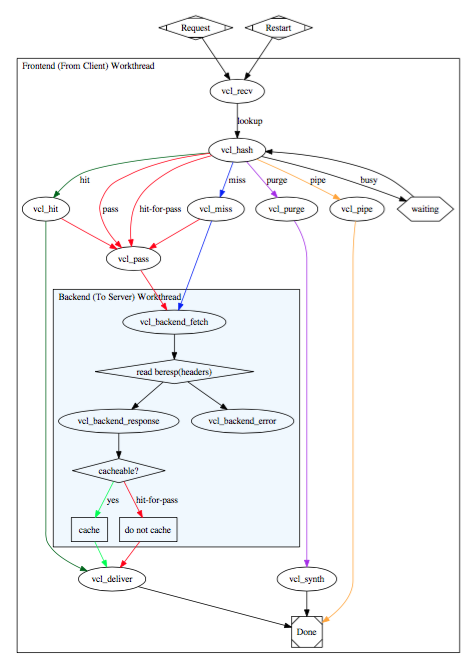
VCL(Varnish Configuration Language)作为Varnish核心的配置,作为一门小型的领域特性语言,其描述了Varnish应该如何处理请求,大致如下面的流程图:
常用的一些内置函数:
下面是一份正在使用的配置:
# vcl语言版本
vcl 4.0;

import directors;

backend fdfs_t_ngx_01 {
    .host = "xx.yy.120.185";
    .probe = {
        .url = "/";
        .interval = 5s;
        .timeout = 1s;
        .window = 5;
        .threshold = 3;
    }
}
backend fdfs_t_ngx_02 {
    .host = "aa.bb.120.193";
    .probe = {
        .url = "/";
        .interval = 5s;
        .timeout = 1s;
        .window = 5;
        .threshold = 3;
    }
}

sub vcl_init {
    # 使用轮询负载均衡
    new fdfs_t_ngx = directors.round_robin();
    fdfs_t_ngx.add_backend(fdfs_t_ngx_01);
    fdfs_t_ngx.add_backend(fdfs_t_ngx_02);
}

# 允许使用失效缓存的IP
acl purgers {
    "localhost";
    "127.0.0.1";
}

# 接收客户端请求
sub vcl_recv {

    # 失效缓存请求处理
    if (req.method == "PURGE") {
        if (!client.ip ~ purgers) {
            return (synth(405));
        }
        return (purge);
    }

    # 路由一个后端服务器
    set req.backend_hint = fdfs_t_ngx.backend();
    if (req.url ~ "\.(png|gif|jpg)$") {
        return(hash);
    }
}

# 处理后端请求
sub vcl_backend_response {
    if (bereq.url ~ "\.(png|gif|jpg)$") {
        # 清空后端的cookie,varnish默认若后端返回的cookie则不会进行缓存
        unset beresp.http.set-cookie;
        unset beresp.http.cookie;
    }
}

# 分发内容到客户端
sub vcl_deliver {

    # 移除一些header
    unset resp.http.Server;
    unset resp.http.ETag;
    unset resp.http.X-Varnish;

    # 设置一些header
    set resp.http.Cache-Control = "max-age=31536000";
    set resp.http.Via = "cache .119.52";

    return(deliver);
}
Varnish Agent是一个微后台服务,用于远程控制和监控Varnish服务,使用比较简单:
# 安装agent,与varnishd同一台机器
yum install --nogpgcheck varnish-agent
# 使用
varnish-agent [-C cafile] [-c port] [-d] [-g group] [-H directory]
              [-h] [-K agent-secret-file] [-n name] [-P pidfile]
              [-p directory] [-q] [-r] [-S varnishd-secret-file]
              [-T host:port] [-t timeout] [-u user] [-V] [-v]
              [-z vac_register_url]
-C cafile CA certificate for use by the cURL module. For use when the VAC register URL is specified as https using a certificate that can not be validated with the certificates in the system's default certificate directory.
-c port Port number to listen for incoming connections. Defaults to 6085.
-d Run in foreground.
-g group     to run as. Defaults to varnish.
-H directory    Specify where html files are found. This directory will be accessible through /html/. The default provides a proof of concept front end.
-h Print help.
-K agent-secret-file
    Path to a file containing a single line representing the username and password required to authenticate. It should have a format of username:password.
-n name Specify the varnish name. Should match the varnishd -n option. Amongst other things, this name is used to construct a path to the SHM-log file.
-P pidfile  Write pidfile.
-p directory    Specify persistence directory. This is where VCL is stored.
-q Quiet mode. Only log/output warnings/errors.
-r Read-only mode. Only accept GET, HEAD and OPTIONS request methods.
-S varnishd-secret-file
    Path to the shared secret file, used to authenticate with varnish.
-T hostport Hostname and port number for the management interface of varnish.
-t timeout  Timeout in seconds for talking to varnishd.
-u user User to run as. Defaults to varnish.
-V Print version.
-v Verbose mode. Be extra chatty, including all CLI chatter.
-z vac_register_url
    Specify the callback vac register url.
varnish-agent内置的UI并不是很友好,可以使用Varnish Dashboard:
# 获取varnish dashboard
git clone git://github.com/brandonwamboldt/varnish-dashboard.git
# 设置dashboard用户名密码
# username:password
vim /etc/varnish/agent_secret
# 启动varnish agent
varnish-agent -H /path/to/varnish-dashboard
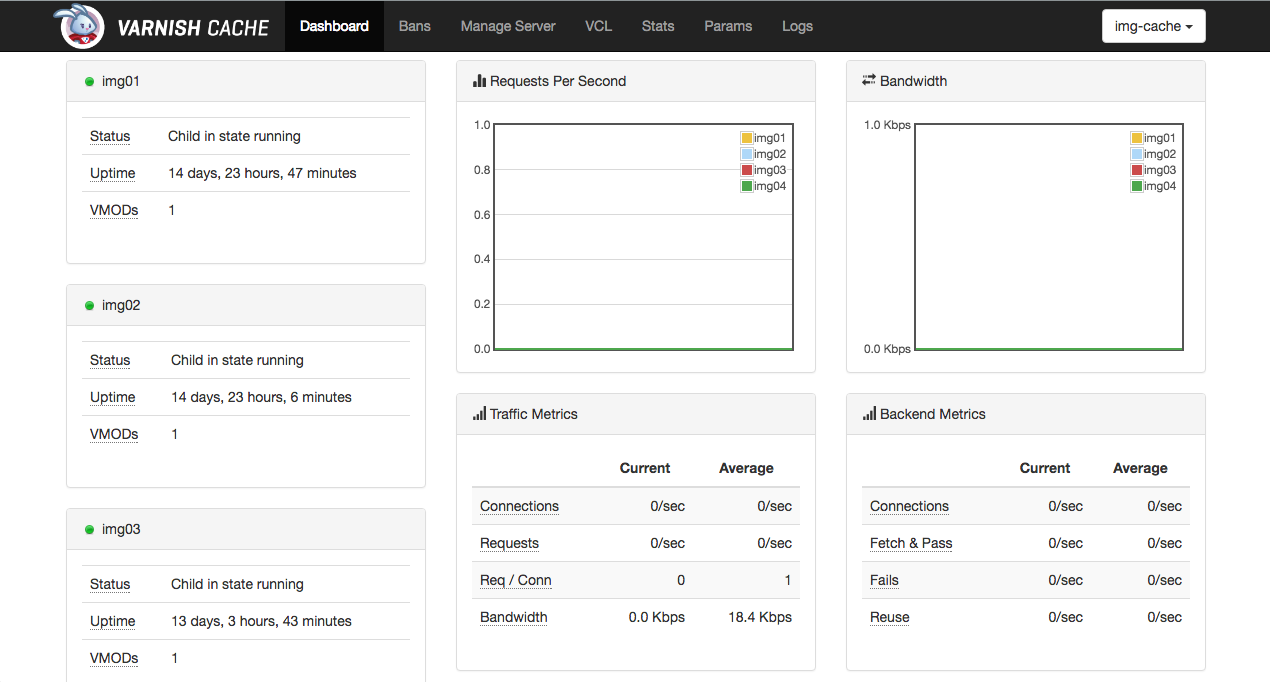
Varnish Dashboard配置样例:
# vim /path/to/varnish-dashboard/config.js
var config = {
  servers: [
    {name: "img01",host: "10.110.176.30",port: 6085,user: "xx",pass: "yy"},
    {name: "img02",host: "10.110.176.100",port: 6085,user: "xx",pass: "yy"}
  ],
  groups: [{
    name: "img-cache",
    servers: ["img01", "img02"]
  }],
  update_freq: 2000,
  max_points: 100,
  default_log_fetch: 10000,
  default_log_display: 100,
  show_bans_page: true,
  show_manage_server_page: true,
  show_vcl_page: true,
  show_stats_page: true,
  show_params_page: true,
  show_logs_page: true,
  show_restart_varnish_btn: true
};
访问http://${DASHBOARD_IP}:6085/html/后,即可在界面进行监控和操作: